


TAK: Production Summary
Want to know more about how our TAK boards are created? Read on for detailed information on the process and materials involved in creating a TAK board and pieces. This guide is intended to offer some insight on the overall process and accuracy involved in the crafting process (note that the photos below are from a custom Cherry / Maple TAK board).
The Board
Lumber
Surface materials are processed from hand selected rough sawn timber. The raw lumber is processed, cut, and dressed in-house (in Michigan!), resulting in 24” x 4” boards that are ⅛” in thickness.


Laser Cutting
The board surface and corresponding inlay are all laser cut for accuracy. Near perfect edging and fit is required for an accurate final product. A 100W CO2 laser can provide an amazing level of accuracy and allows for clean edges and very predictable part sizes.


Assembly
Lasered pieces are dry assembled to ensure an accurate fit, then taped together in preparation for gluing. This process allows for a clear test fit and presents a good overview of the aesthetics of the final product. Individual pieces are swapped in place and oriented to best overall effect.
Protip: Blue painters tape is used throughout the project to take advantage of its elastic and adhesive properties. Great for fitting small pieces together!
The Substrate
MDF is used as a substrate (base) to minimize wood movement and to provide a dense and weighty core for the board. The taped pieces are glued to the MDF, taped in place, and pressured by hand to force out any excess glue.
MDF stands for Medium Density Fiber Board. It is an engineered wood product containing wax and resin and is known for its excellent stability.


Adhesion
The glued core and taped surface are again taped together to prevent movement, then are clamped under intense pressure to guarantee a complete bond between the wood and MDF.
Edge clamping and internal clamping are both used and combined with an identical piece of MDF to provide even pressure to the entire surface.
The clamped board is then set aside for several hours to allow the glue to set-up for sanding.


Sanding Clean Up
Once the glue has set up and dried, the board is removed from the clamps for clean up.
Tape is removed by hand with use of a heat gun to soften the tape adhesive. Remaining tape is scraped off, picked off, or sanded off as a last resort.
The resulting board is then hand sanded via orbital with a heavy grit to remove glue overflow and to begin the process of creating a smooth and flat surface.


Filling Seams
Once the edges are dry and ready to be worked, the surface is prepared for sanding and finishing.
Low viscous CA glue is applied to all wood seams with visible creases. The resulting joint is then sanded to fill the crease with native wood dust. This process is repeated as many times as necessary to completely fill the crease and achieve a perfectly smooth surface.
CA glue is fast drying and also provides incredible stability for inlaid pieces and corners.


Pro-tip: using excessive CA glue during this process is recommended. This process generally blends cleanly, fills any rough surfaces, and hides occlusions.

Flattening Pass
Once filled and sanded, the board is then ready for a flattening pass. This process involves marking the entire surface with a pencil and then sanding with a 120 grit orbital.
Pencil marking surfaces is a classic woodworking tip when sanding - by passing the orbital sander over the surface and observing the removal of pencil lead, one can easily visualize the difference in surface height on the work piece. Pencil lead is easily removed and does not impact the final product.
This process is repeated until the pencil lead is removed entirely in a single pass guaranteeing a smooth surface.

Hand Sanding
“Any product that will spend its time in human hands should also be sanded by human hands.” - Me
Hand sanding the work surface is just what it sounds like - repeatedly sanding the surface, in the direction of the grain, in escalating grits of sandpaper. Most importantly the workpiece is handled by hand while increasing the granularity of each sanding pass to get the smooth to the touch.
We prefer to hand sand all board game surfaces over 8 variations of grits from 120 up to 2500. At 2500 grit the human hand cannot detect roughness or variations in the surface. It feels very smooth and it is very smooth.
The main advantage is qualitatively handling the workpiece in the same way the customer will handle it.

Pro-tip: Human hands are incredibly tactile sensitive and can detect the smallest variation in surface differences. The difference between amateur woodworking and professional woodworking is sanding.


Finishing
We finish everything with aerosolized water based polyurethane. TAK boards are finished with one coat of clear matte, followed by two coats of clear gloss.
Each coat is baked on with a heat gun, and a light abrasive is passed over the surface in between coats to combat rising wood grain from exposure to liquid.
The final coat is completed by passing a brown paper bag over the surface in the direction of the wood grain. The result is a durable, glossy finish that is ready for your table.
The final touch is black felt on the underside to prevent table-top friction.
Pro-tip: If the finish is too glossy for your taste, simply rub the surface with a brown paper bag in the direction of the grain. Gloss can be easily dampened this way, and can also remove any hand-detectable imperfections (use this tip on any finished wood product!).
The Pieces

Piece Origins
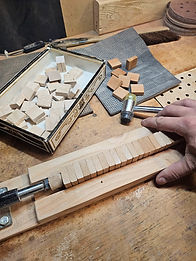
The pieces (stones) begin as long strips of wood that are subsequently cut to size and turned into cute little squares.
Contrary to assumption, this is the most labor intensive part of crafting a complete TAK board as each stone requires individual handling.
After being ripped to width, the strips are then cross-cut to square rectangles that are approximately ⅜” thick. This is done with 8-10 strips per cut to increase efficiency.

Sanding
The pile of rectangular cut stones are then loaded into a custom jig in order to round the corners en masse.
The stone edges are sanded smooth and each corner is rounded over multiple passes via orbital sander.
Once the set is completed, the edge of each stone is individually sanded ensuring a comfortable hand fit. Four edges. By hand. For each stone. My wrists are on fire.
Stones are then finished with polyurethane as described above and baked to perfection. The final set is loaded into a burlap sack awaiting the capstone.


The Capstones


Hand Turning
Capstones are hand turned on a lathe (a piece of equipment that spins material at a high rpm to allow symmetrical carving).
This process involves using lathing tools to turn a square piece of stock into a rounded dowel. Calipers are intermittently used to ensure accuracy in diameter to a master piece. The capstone is rough sanded while on the lathe.
The piece is then fitted into a drill chuck (hardware to hold round pieces) and sanded on a belt sander to achieve a domed profile.
Capstones are then finished in the same manner as described above, and a final piece of felt is added to the bottom.

The Final Product
The finished TAK boards, pieces, and capstones are a culmination of woodworking techniques and efficiency processes. The complete TAK set is a beautiful high-quality addition to the enthusiasts next game night.
Special thanks to Douglas for initiating this document with his custom order. All photos are from his custom Cherry / Maple TAK board.
